
Staff can use the same ArrivalsHQ kiosk as visitors to sign in and out. Instead of filling in the visitor form, they scan their badge or enter a code, then choose their status, such as In the office, On a break or Off site. No host alert is sent.
Staff statuses feed into your fire roll call, so you always know who is in the building.
Before you start
You need admin access to ArrivalsHQ in the Clearooms portal.
The Identify staff member and Set staff status modules are Arrivals HQ Essentials features.
Staff need to be users in your Clearooms organisation.
1. Turn on staff sign-in
- In the ArrivalsHQ menu, under Management, select Staff.
- In the Staff sign-in section, switch on Enable staff sign-in.
- Choose the options you want (see below).
- Allow name search: lets someone without a code sign in by choosing their name. Anyone can sign in as anyone, so leave this off if identity matters.
- Check in their desk booking: signing in at the kiosk also marks that person’s desk booking for today as attended, so nobody checks in twice.
- Sign staff in and out automatically: uses the office geofences in the Clearooms mobile app. Each person also has to switch this on in their own profile.
Staff sign-in settings

2. Set up your staff statuses
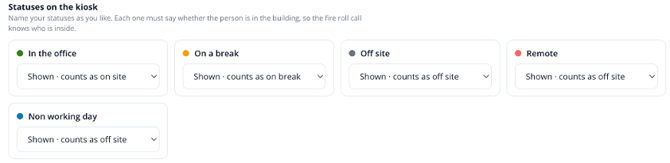
Under Statuses on the kiosk, choose how each status works. For each one, pick whether it is Not on the kiosk, or shown and counted as on site, off site or on break.
Every status must say whether the person is in the building, so the fire roll call knows who is inside.
Statuses on the kiosk
3. Create the staff journey
- Go to Journeys > Journeys and select New journey. Choose Blank canvas to build the journey yourself.
- Give it a clear name, such as Staff sign-in.
- Check the trigger at the top is Walk-in tap-to-start.
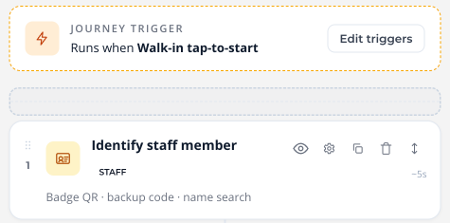
- From the Staff group in the module library, drag Identify staff member onto the canvas, followed by Set staff status.
- Finish with a Thank-you screen from the Output group.
The start of a staff journey in the builder
4. Choose how staff identify themselves
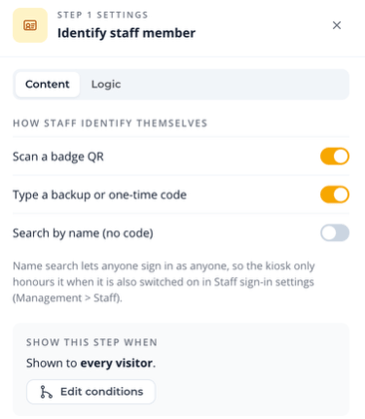
Select Configure on the Identify staff member step and choose which options to offer:
- Scan a badge QR
- Type a backup or one-time code
- Search by name (no code). The kiosk only allows this when Allow name search is also switched on in the Staff sign-in settings.
Identify staff member settings
5. Choose which statuses staff can set
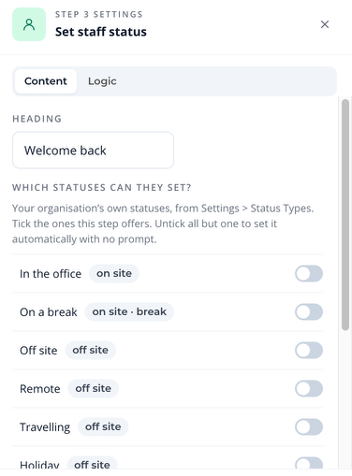
Select Configure on the Set staff status step.
- Heading: the greeting staff see, for example Welcome back.
- Which statuses can they set? Tick the statuses this step should offer. If nothing is ticked, the kiosk offers all of them.
Statuses come from your organisation’s list in Settings > Status Types.
Set staff status settings
Tip: separate sign-in and sign-out journeys
If you untick all but one status, it is set automatically with no prompt. For example, a sign-out journey that only offers Off site signs staff out in one tap.
6. Let staff sign out
There are a few ways for staff to sign out, depending on how you set things up:
- Choose a status: staff run the same journey and choose an off-site status, such as Off site.
- Staff sign out shortcut: in Settings > Branding, under the welcome screen options, switch on Staff sign out to show a shortcut in the top corner of the kiosk.
- Ask the question: add the Sign in or out module to ask staff which they are doing and send them the right way. If you do this, turn off the Staff sign out shortcut.
7. Publish and assign to tablets
- Select Preview as visitor to check the journey.
- Select Publish.
- Select Tablets to assign the journey to the kiosks staff will use.
Using one journey for staff and visitors
You can also add staff sign-in to a visitor journey. In the Visitor type picker, make a type such as Staff into a staff sign-in type. See the Setting up visitor types guide.
8. What staff see at the kiosk
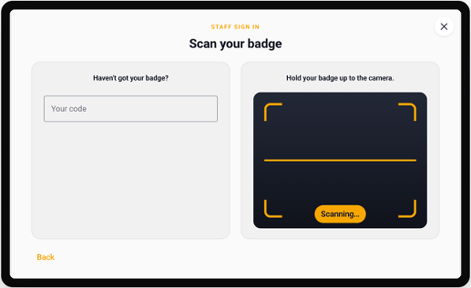
First, staff scan their badge by holding it up to the camera, or type their code under Haven’t got your badge?.
Scanning a badge or entering a code
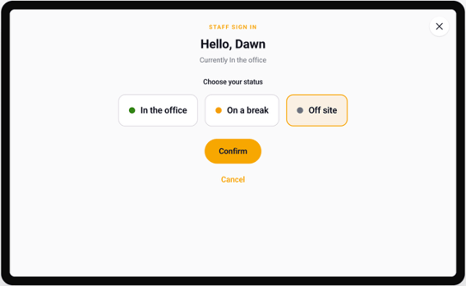
They then see their current status, choose their new one and select Confirm.
Choosing a status
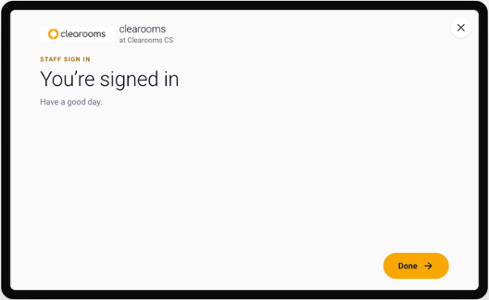
Finally, a thank-you screen confirms they are signed in.
The staff thank-you screen
9. See who is in
The Staff page lists everyone with their current status and when they were last seen. You can search, and filter by status, team or office. Admins can also use Set status next to a person to change their status by hand, for example if they forgot to sign out.
Tips
- Leave name search off unless you trust everyone who can reach the kiosk.
- Make sure every status says whether the person is on site, so your fire roll call is accurate.
- Turn on Check in their desk booking if staff book desks in Clearooms, so they only need to check in once.
- Remind staff to sign out when they leave, or use automatic sign-out with the mobile app.