
Hosts are the people visitors come to see. When a visitor signs in at the kiosk, they choose their host from your host directory, and ArrivalsHQ lets that host know their visitor has arrived.
Only people in your host directory can be selected at sign-in, so it is important to add everyone who might receive visitors.
Before you start
You need admin access to ArrivalsHQ in the Clearooms portal.
Hosts are chosen from the people in your Clearooms organisation, so make sure they have been added as users first.
1. Open the Hosts & access page
In the Clearooms portal, select the ArrivalsHQ tab. In the left-hand menu, under Admin, select Hosts & access.
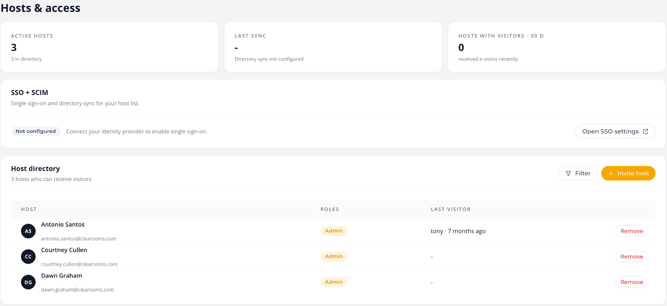
The page shows:
- Active hosts: how many people are in your host directory.
- Last sync: when your host list last synced from your identity provider, if you have set up directory sync.
- Hosts with visitors · 30 D: how many hosts have received a visitor in the last 30 days.
- Host directory: everyone who can receive visitors, with their role and their most recent visitor.
The Hosts & access page
2. Add hosts
- In the Host directory section, select Invite host.
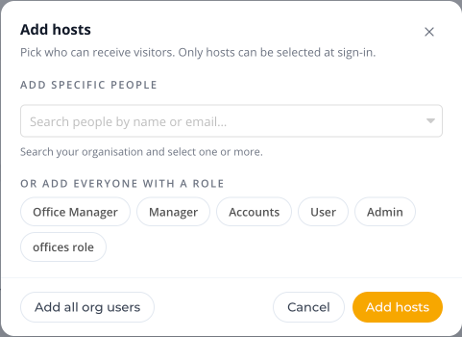
- In the Add hosts window, choose who to add (see the options below).
- Select Add hosts.
There are three ways to add hosts:
- Add specific people: search your organisation by name or email and select one or more people.
- Add everyone with a role: select a role, such as Manager or Office Manager, to add everyone who has it. The roles shown are the ones set up in your organisation.
- Add all org users: adds everyone in your organisation as a host in one go.
The Add hosts window
3. Find or remove a host
To find someone in a long list, select Filter and search by name or email.
To stop someone receiving visitors, for example when they leave, select Remove next to their name. They are taken out of the host directory and can no longer be chosen by visitors at the kiosk.
4. Keep your host list up to date automatically
If your organisation uses an identity provider, you can connect it under SSO + SCIM to turn on single sign-on and sync your host list automatically. Select Open SSO settings to set this up. Once connected, Last sync shows when your list was last updated.
With directory sync in place, new starters and leavers are reflected in your host list without anyone having to add or remove them by hand.
5. How hosts are notified
When a visitor signs in and chooses a host, ArrivalsHQ notifies that host. By default this is by email, which works for every host. You can also post arrival notifications to a shared Slack or Microsoft Teams channel.
Notification channels and rules, such as Notify host on visitor sign-in, are set in Settings > Notifications. Your sign-in journey also needs a Notify someone step so that the host is told when their visitor arrives.
Good to know
Slack and Teams notifications post to a shared channel. Direct messages to individual hosts are not available yet.
6. What visitors see
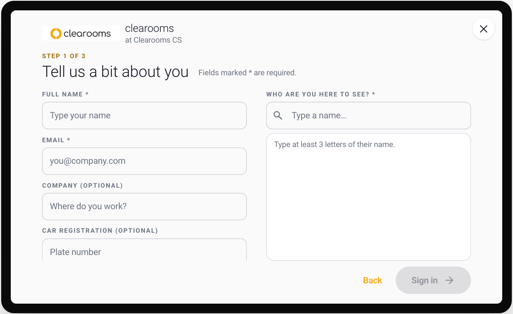
At the kiosk, visitors find their host under Who are you here to see? by typing at least three letters of the host’s name and choosing them from the list.
Choosing a host at the kiosk
Tips
- Adding hosts by role saves time and keeps new team members covered as they join that role.
- Check your host directory regularly and remove people who have left.
- Ask hosts to keep their name and email up to date, so visitors can find them easily and notifications reach the right inbox.
- Use directory sync if you have a large or frequently changing team.