
Introduction
If you use Office 365 within your organisation, setting up single sign-on will allow all of your users to access Clearooms without needing to invite them and for them to remember additional passwords.
! When you turn SSO on in the portal this will become the only way to login, should the set up be incorrect or you need to turn it off for any reason the url below will allow you to login using your username and password.
https://portal.clearooms.com/login?sso=0
You can download this guide to PDF below or follow the guide online here
Get your Clearooms SSO Settings
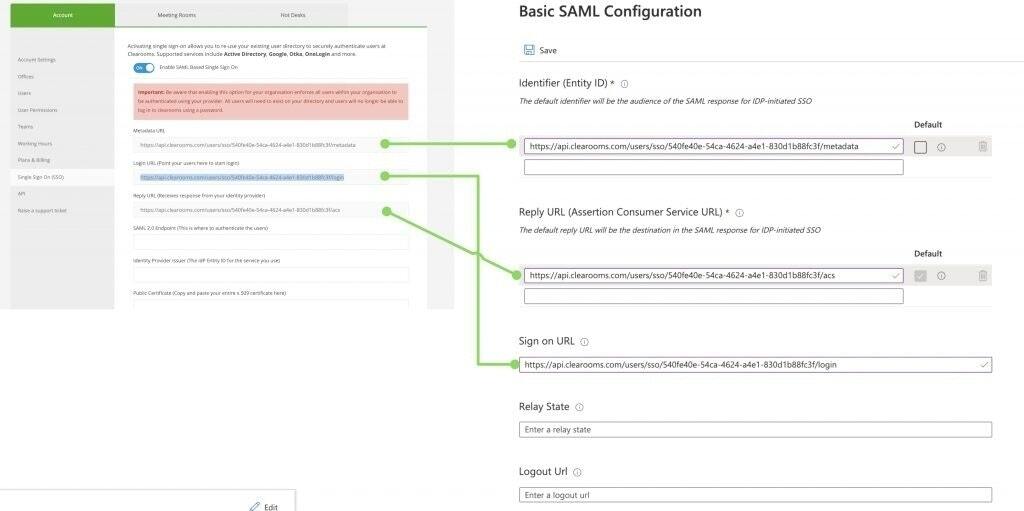
To set up single sign-on, you will need to let Office 365 know your unique Clearooms Entity ID, ACS URL, and Start URL.
To get this, in Clearooms head to Settings > Single Sign-On and toggle the Enable SAML Based Single Sign-On switch. This won't turn it on immediately for users at this stage but it will show you the required information you will need.

Create the app
To set up single sign-on for an application:
- In the Azure AD portal, select Enterprise applications. Then select "+ New application followed by "Create your own application"
- Give the application a name such as "Clearooms SSO"
- Ensure "Integrate any other applications you don't find in gallery (Non-gallery) is selected.

Assign Users
- Open Users and groups
- Assign groups or individual users

Enable Single Sign On
- Open "Single Sign On"
- Select SAML
- Copy Meta Data URL in Clearooms and paste into the "Entity ID" Field
- Copy the Reply URL in Clearooms and paste into the "Reply URL"
- Copy the Login URL in Clearooms and paste into the "Sign on URL"
- Save (The page this returns to may need refreshing to see the changes)
- Open Step 3
- Download "Certification base 64"
- Open the downloaded file in a text editor or similar and copy the text (certificate)
- Paste into the "Public Certificate" slot in Clearooms
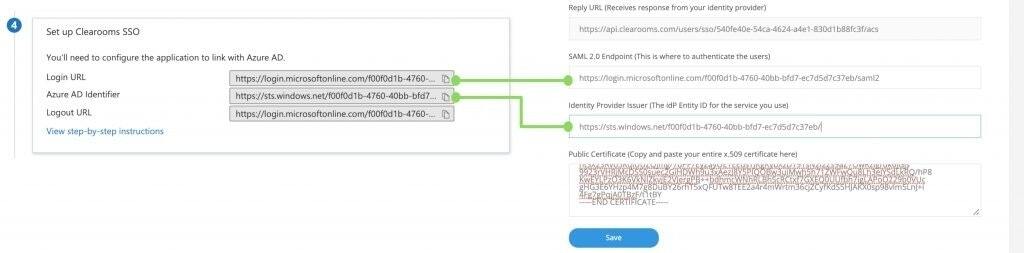
- Open Step 4
- Copy the Login URL and paste into the Clearooms SAML 2 End Point
- Copy the Azure AD Identifier and paste into the Clearooms "Identify provider issuer" field
Add the Clearooms logo (Optional)
- Download the Clearooms logo from here
- Open Properties
- Upload the logo and save

Send your users the login link
- Copy the Login URL
- Email this to a user(s) that have been given access in step 3
- This link will direct them to your login page and when authenticated will create the users in Clearooms.
Changing the Display Name
By default, we concatenate first name and last name to generate the users display name. If you wish to change this behaviour you can send an additional claim as part of your SSO response with the display name that you wish to use.- Click Edit under Attributes and Claims

- Click Add New Claim

- Add a new claim called formattedname along with the namespace http://schemas.clearooms.com/identity/claims
- Set the source attribute to the attribute you wish to send, or create a transformation then click save.
