
Visitor types let you ask people what brings them in, so each type gets the sign-in steps that suit them. For example, contractors can watch a safety video and sign an induction, while interview candidates go straight to a short form.
Your visitor types are shared across your organisation. You set them up once and they are available in every journey that uses the visitor type picker.
Before you start
You need admin access to ArrivalsHQ in the Clearooms portal.
The Visitor type picker is an Arrivals HQ Essentials plan feature.
Changes to your list of visitor types save straight away and apply to all journeys, so take care when renaming or removing a type that is already in use.
1. Add the visitor type picker to a journey
You can ask for a visitor type in two ways:
- When creating a new journey: in the guided setup, choose Ask their visitor type at step 2 (Visitor types). At step 5 (Routing), choose By visitor type to give each type its own path.
- In an existing journey: open the journey in the builder and drag the Visitor type picker module from the Identify group in the module library onto the canvas. It usually works best as the first step.
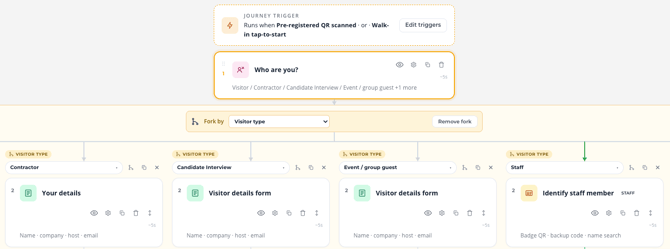
The visitor type picker as the first step, with a fork for each type below it
2. Add and manage your visitor types
- On the canvas, select Configure on the visitor type picker step.
- Under Visitor types, type a name into Add a visitor type, for example Contractor, and select Add.
- Repeat for each type you need.
Each visitor type in the list has these controls:
| Control | What it does |
| Tick box | Shows the type on the kiosk. Untick it to hide a type without deleting it. |
| Move up / Move down | Changes the order the types appear in on the kiosk |
| Staff icon | Makes this a staff sign-in type (see section 3) |
| Remove (cross) | Deletes the type |
| Default | The type marked Default is pre-selected when a visitor skips the picker |
Visitor type picker settings
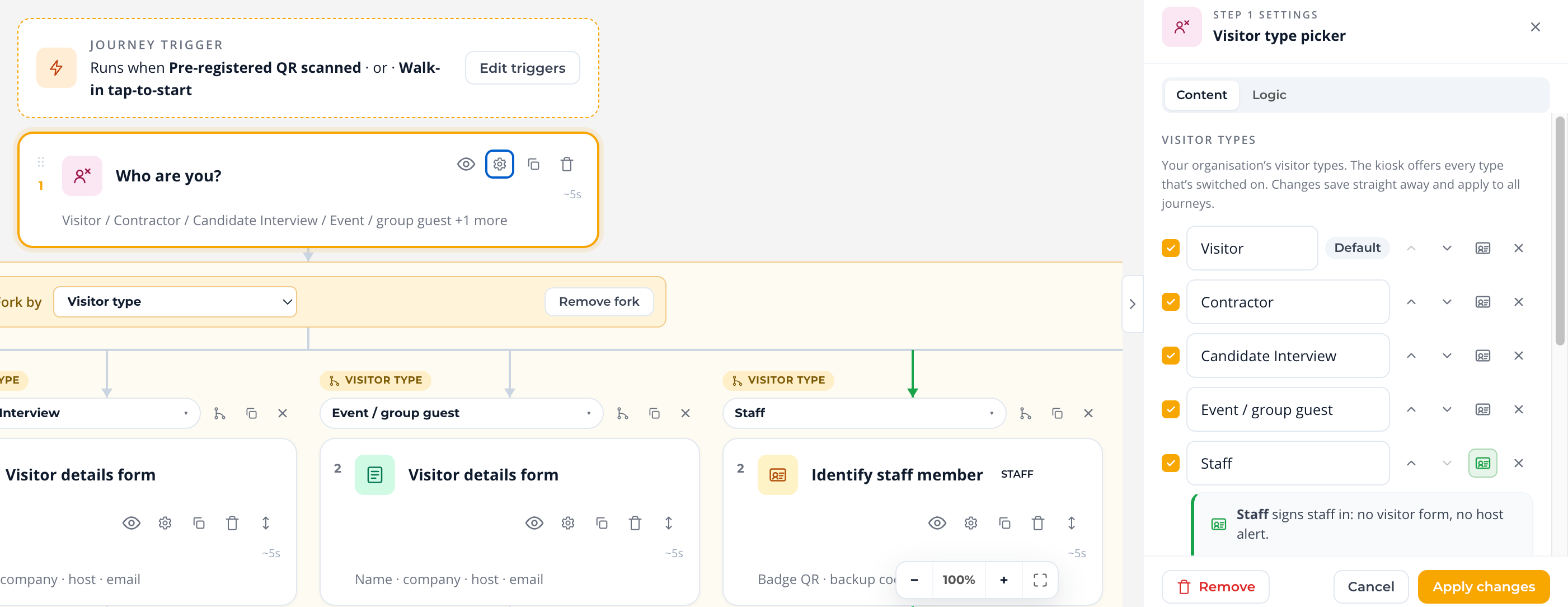
To show the picker step only to some people, use Show this step when and select Edit conditions, or open the Logic tab and select Add rule. Leave it empty to show the step to every visitor. Select Apply changes when you are done.
3. Set up a staff sign-in type
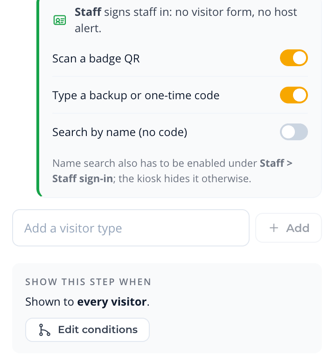
If staff sign in on the same kiosk, you can turn a type such as Staff into a staff sign-in type. Select the staff icon next to it. Staff who choose this type are signed in without filling in the visitor form, and no host alert is sent.
You can then choose how staff identify themselves:
- Scan a badge QR
- Type a backup or one-time code
- Search by name (no code). This option also has to be turned on under Staff > Staff sign-in, otherwise the kiosk hides it.
Staff sign-in options
4. Give each visitor type its own steps
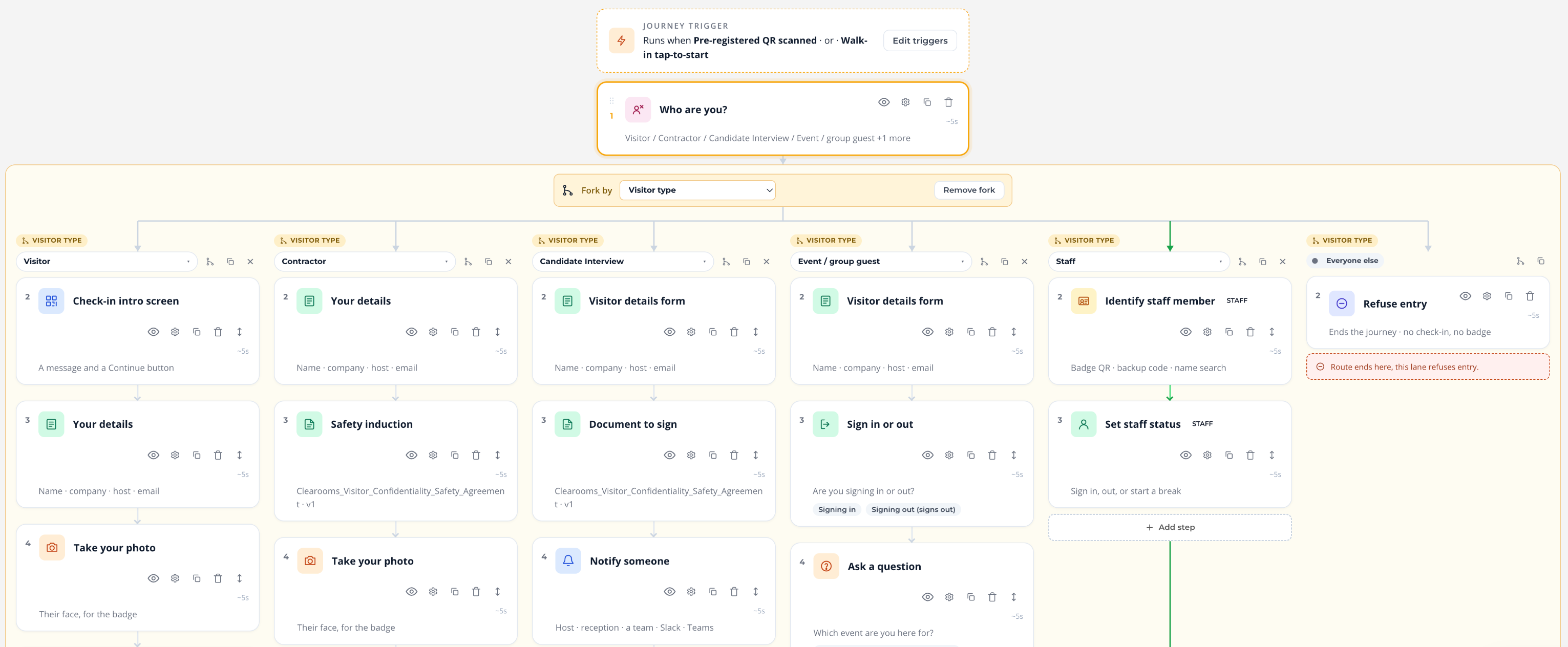
Below the picker, a Fork by bar set to Visitor type splits the journey into a separate lane for each type. If you chose By visitor type routing in the guided setup, this fork is added for you.
- In each lane, check the Visitor type label at the top shows the right type. Use its drop-down to change it.
- Drag modules from the module library into the lane to build that type’s steps, for example a Document to sign or Safety video for contractors.
- End each lane with a Thank-you screen, or let the lanes join back together where the canvas says Routes merge, continue with shared steps below.
The Everyone else lane catches any visitor type that does not have its own lane. You can use it for a general sign-in, or add Refuse entry to stop anyone without a matching type from signing in.
Each lane also has these options in its header:
- Make this branch its own route: moves the lane onto its own canvas as a sub-journey, which helps keep large journeys tidy.
- Link an existing route or journey: reuses steps you have already built.
- Remove this branch: deletes the lane.
A separate lane of steps for each visitor type
Tip
To show just one step to certain visitor types, rather than building a whole lane, open that step’s settings and use Show this step when to add a rule for the visitor type.
5. Preview and publish
- Select Preview as visitor to check each type sees the right steps.
- Select Publish to send your changes to your tablets.
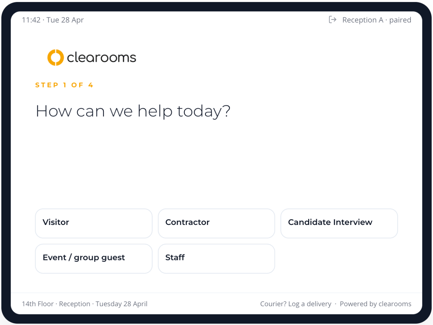
On the kiosk, visitors see How can we help today? with a button for each type you have switched on.
How visitor types appear on the kiosk
Tips
- Keep the list short. Three to six types is plenty for most receptions.
- Use names visitors will recognise, such as Contractor or Interview, rather than internal terms.
- Put your most common visitor type first so it is quickest to tap.
- Hide a type you no longer need rather than deleting it, so it is easy to bring back.