
A sign-in journey is the set of screens a visitor works through on your reception tablet, from tapping to start through to the thank-you screen. You can build as many journeys as you need, for example one for visitors and another for contractors, and assign each one to the tablets that should run it.
This guide shows you how to create a journey, change its steps in the journey builder, publish it and assign it to your tablets.
Before you start:
-
You need admin access to ArrivalsHQ in the Clearooms portal.
-
Pair at least one kiosk tablet so you have somewhere to run the journey.
-
Pair at least one kiosk tablet so you have somewhere to run the journey.
-
Set up your hosts so visitors can choose who they are visiting.
-
Some steps depend on your plan. These are labelled Arrivals HQ Essentials, Plus or Professional in the module library.
1. Open the Journeys page
-
Log in to the Clearooms portal and select the ArrivalsHQ tab.
-
In the left-hand menu, under Admin, select Journeys and then Journeys.
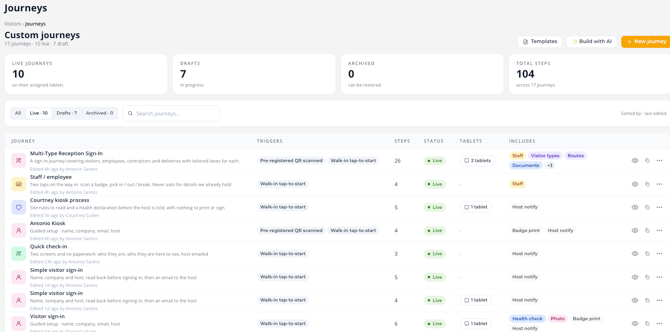
The Journeys page lists all of your journeys, with totals for live journeys, drafts, archived journeys and total steps along the top. Use the All, Live, Drafts and Archived filters or the search box to find a journey. Each row shows its triggers, number of steps, status, assigned tablets and what it includes, such as badge printing or host notifications.
2. Create a new journey
There are three ways to start a journey from the top right of the Journeys page:
-
New journey: answer a few quick questions and ArrivalsHQ builds the journey for you. This is the easiest way to start.
-
Templates: start from a ready-made journey and adjust it.
-
Build with AI: describe the journey you want and ArrivalsHQ drafts it for you.
The steps below use New journey. The guided setup has seven steps, and the Live preview on the right updates as you go. If you would rather build from scratch, select Blank canvas at the top of the setup, or select Start from a template.
Step 1: Basics
Enter a Journey name your team will recognise, or pick one of the suggestions, such as Visitor sign-in or Contractor sign-in. You can change the name at any time. Select Continue.
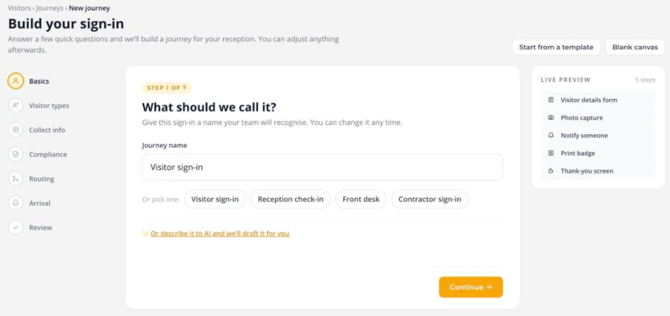 Step 1: name your journey
Step 2: Visitor types
Choose Everyone the same for one simple flow for all visitors, or Ask their visitor type if different visitors need different steps, for example a safety video for contractors only.
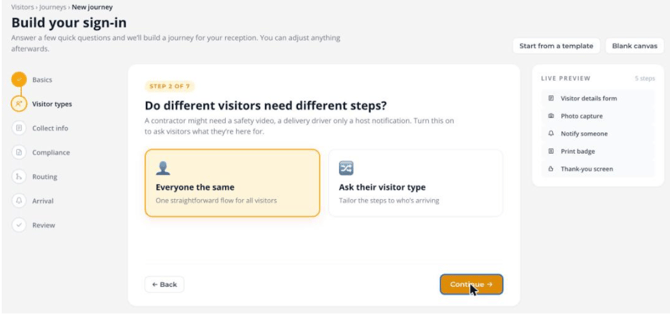 Step 2: choose whether visitors need different steps
Step 3: Collect info
Tick the details you want visitors to enter. Full name is always collected. You can also choose Company, Email address, Who they’re visiting, Reason for visit, Photo for their badge and Scan an ID document.
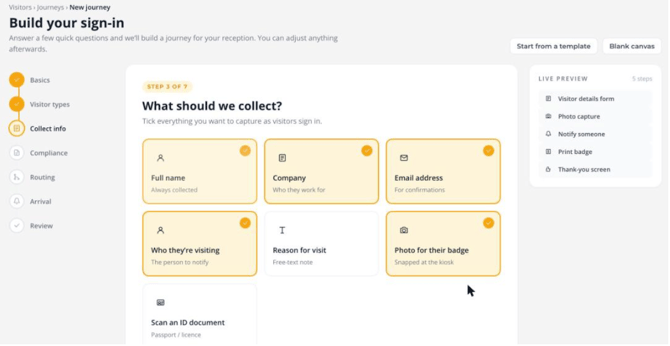 Step 3: choose what to collect
Step 4: Compliance
Add any agreements or safety steps that every visitor must complete: Sign an agreement (NDA, induction or consent), Health declaration, Watch a safety video or Show safety instructions.
Skip any you do not need.
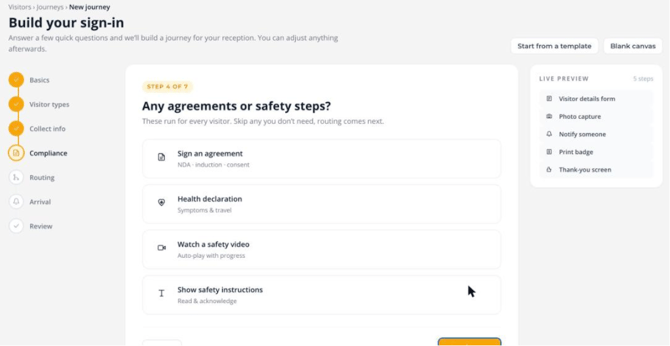 Step 4: add agreements and safety steps
Step 5: Routing
Choose One path so everyone follows the same steps, By visitor type (you need to turn on visitor types in step 2 first) or By time of day for a separate out-of-hours path. You can add more branches later in the builder.
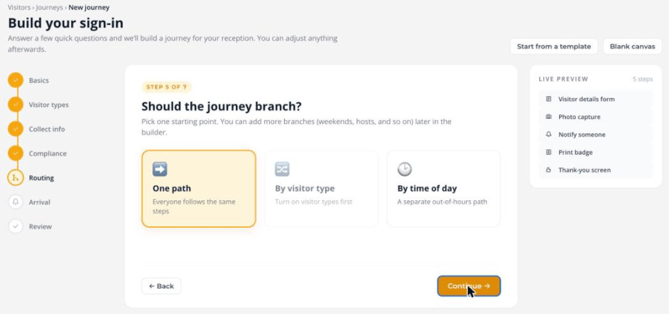 Step 5: choose whether the journey branches
Step 6: Arrival
Choose what happens once the visitor has signed in: Notify the host by email and Print a badge at reception. You can also edit the Thank-you message shown at the end.
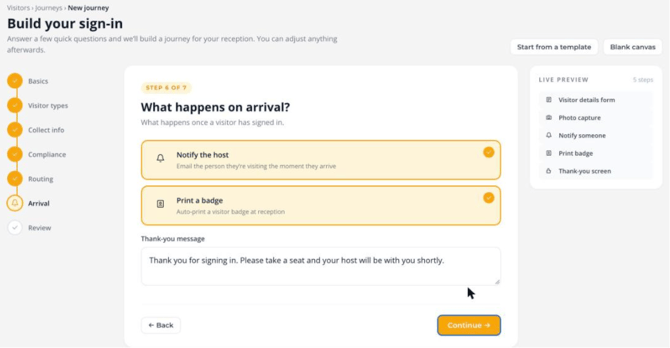 Step 6: choose what happens on arrival
Step 7: Review
Check the list of steps, then select Create journey and open builder. Your journey is created and opens in the journey builder, where you can fine-tune it before publishing.
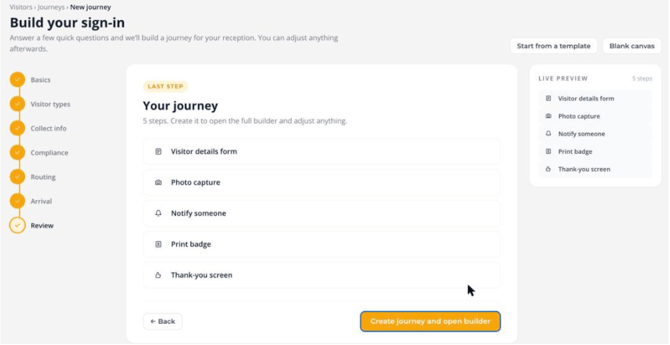 Step 7: review your journey
3. Edit a journey in the builder
To edit an existing journey, select its name on the Journeys page. The journey builder has three areas:
-
Module library (left): every step you can add, grouped by type. Use the search box to find one quickly.
-
Canvas (centre): your journey from top to bottom, starting with the journey trigger.
-
Live preview (right): how the selected step looks on the kiosk.
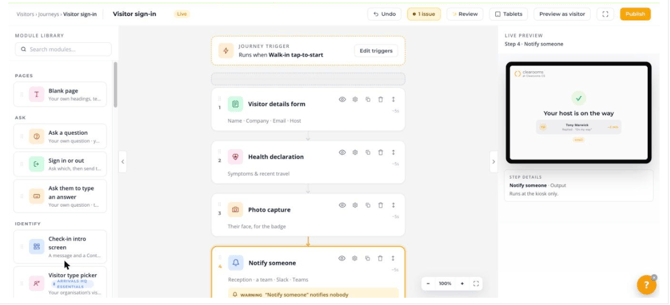 The journey builder
Editing a live journey
Changes you make to a live journey are not sent to your tablets straight away. Visitors keep seeing the current version until you select Publish.
Add a step
Drag a module from the module library onto the canvas and drop it where you want it in the journey.
Change a step
Each step on the canvas has five icons:
| Icon | What it does |
| Preview | Shows the step in the live preview |
| Configure | Opens the step settings |
| Duplicate | Makes a copy of the step |
| Delete | Drag |
| Move |
Select Configure to open the step settings. On the Content tab you can change what the step shows. For example, on the Visitor details form you can:
-
Tick or untick fields to show or hide them
-
Select the star next to a field to make it required
-
Use the arrows to reorder fields, or the cross to remove one
-
Add your own field, such as vehicle registration, then select Add
Under Show this step when, select Edit conditions to show the step only to some visitors. Use the Logic tab for more options. Select Apply changes to save the step, or Cancel to close without saving.
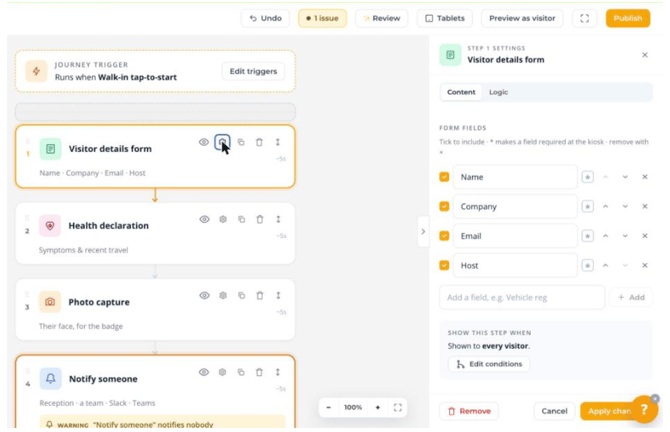 Step settings for the Visitor details form
Change the journey trigger
The trigger at the top of the canvas controls when the journey runs, for example Walk-in tap-to-start or Pre-registered QR scanned. Select Edit triggers to change it.
Other builder tools
-
Undo reverses your last change.
-
Rename: select the journey name at the top to change it.
-
Preview as visitor lets you run through the journey as a visitor would see it.
-
Full screen and the zoom controls give you more room on larger journeys.
4. Module library reference
| Group | Modules |
| Pages | Blank page |
| Ask | Ask a question, Sign in or out, Ask then to type an answer |
| Identify | Check-in intro screen, Visitor type picker (Essentials), Visitor details form, ID document scan (Plus) |
| Compliance | Document to sign (Essentials), Text instructions, Health declaration, Safety video |
| Capture | Photograph something, Photo capture (Plus), Accessibility prompts (Plus) |
| Bookings | Book a desk, Book a meeting room, Book a parking space |
| Decisions | Conditional branch (Professional), Journey redirect (Professional), Wait for approval (Essentials) |
| Output | Print badge (Plus), Notify someone, Webhook/Zapier (Professional), Delivery drop-off (Plus), Check your answers, Thank-you screen, Refuse entry |
| Staff | Identify staff member (Essentials), Set staff status (Essentials) |
5. Check and publish your journey
ArrivalsHQ checks your journey for problems as you build. Any issues are shown in the top bar, for example 1 issue, and are marked on the step in the canvas. A common one is a Notify someone step that has nobody to notify.
1. Select Review to see any problems.
2. Select Publish. Your changes reach your tablets as soon as the journey is published.
3. If the Before you publish window lists warnings, select Review in the builder to fix them, or Publish anyway if you are happy to go ahead.
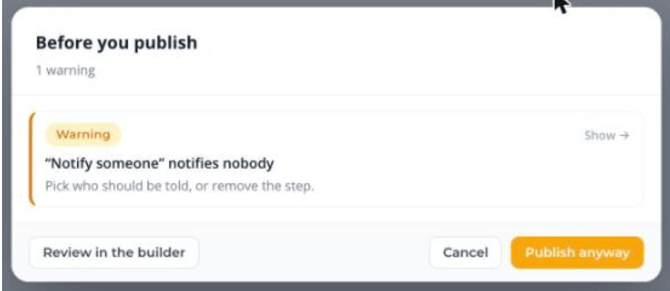 The before you publish check
6. Assign the journey to tablets
A journey only runs on the tablets it is assigned to. In the builder, select Tablets, or on the Journeys page select the three dots next to the journey and choose Assign tablets.
7. Manage your journeys
On the Journeys page, each journey has these options on the right of its row:
-
Preview: see the journey as a visitor would.
-
Duplicate: copy the journey as a starting point for a new one.
-
More options (three dots): Assign tablets, History, Rename, Unpublish, Archive and Delete.
Archived journeys can be restored later from the Archived filter.Tips
Tips
-
Keep journeys short. Every step adds a few seconds at the kiosk.
-
Use Preview as visitor before publishing to check the journey from start to finish.
-
Duplicate a journey that works well rather than starting from scratch.
-
Give each journey a clear name so your team knows which tablet runs what.